| AudioMulch Help > Getting Started | Previous Next |
Tutorial: How to Create and Edit Your First Patch
In this tutorial you will learn how to create your first AudioMulch patch. A patch is a network of sound-creating and processing modules called contraptions. You need to know how to make a patch in order to create sound in AudioMulch, so this tutorial is useful for everyone. You will learn about the main components of the patch, how to create and connect them, and how to get a sound out of your patch. You will also learn how to adjust the sounds you make and how to process sound by adding another contraption to the patch.
Stage one: creating a simple patch with the TestGen contraption
The first part of this tutorial focuses on creating a simple patch with a TestGen contraption, which is one of AudioMulch's Signal Generator contraptions. Signal Generators make their own sound, so this is an easy way to get started as you don't have to import sound into the program from elsewhere.
How to create and connect contraptions
| First, create your contraptions for the patch: |
|---|
|


Next, we will connect the contraptions. This allows audio to flow from the output of the TestGen contraption to the input of the SoundOut. From there the SoundOut routes the audio to your computer's audio output.
| Connect the TestGen contraption to the SoundOut contraption: |
|---|
|


You have now created your first patch! You won't be able to hear any sound yet. To do that you'll have to turn up the volume of the TestGen contraption. We'll do that next.
Note: it doesn't matter where your contraptions are located in the Patcher Pane. As long as the patch cords are connected in the same way as shown in the picture above, the patch will function in the same way.
Controlling contraption parameters with the Property Editor
In this section you'll learn how to open a contraption's Property Editor so you can control the sound you make with the patch. Property Editors have controls you can adjust to change the contraption's sound. These controls include knobs, sliders, control arrows, number edit boxes, and buttons.
Most contraptions have a Property Editor. Buses and AuxIn/AuxOut contraptions don't have Property Editors as they don't have properties to edit.
| Open TestGen's Property Editor: |
|---|
Note: You can use this method to open the Property Editor for any contraption. |

Adjusting contraption parameters
Let's now try adjusting some of the controls on the Property Editor and see what changes they make to the sound.
| First, adjust the volume knob: |
|---|
Note: Dragging upwards on a knob increases whatever value it controls, while dragging downwards decreases it. In this case the volume is increased or decreased but other knobs control different properties. |

If you can't hear any sound coming from your computer, visit the Troubleshooting: What to do if You Can't Hear Anything page of this Help File for some tips.
TestGen is a contraption that generates its own sound. It can produce a sine wave (Sine), or white noise (Noise). A newly created TestGen defaults to the Sine setting.
| Change the type of sound TestGen is making: |
|---|
|

When TestGen is generating a sine wave you can also change its frequency.
| Change the frequency of the sound: |
|---|
Note: The number edit box displays the value of the parameter. You can type a new value into this box, or you can drag on the up-and-down arrows to change the value. Dragging upwards increases whatever value it controls, while dragging downwards decreases it. In this case the frequency is raised or lowered when the numbers are increased or decreased. |


Finding out more about the contraptions you're using
You can find out more about the contraptions you use by clicking on the ? button on the title bar (top) of the Property Editor. This will open the Help File page for that contraption.
Saving your work
| To save your work: |
|---|
|
Moving and closing Property Editors
You can also hide (close) and move Property Editors.
| To hide a Property Editor: | Click on the X button on the title area of the Property Editor (at the top of the Property Editor). The Property Editor will be hidden.
|
| To move a Property Editor: | Click on the title area and drag the Property Editor around the Properties Pane.
|


Stage two: adding another contraption to the patch to process the sound
In this section of the tutorial you will learn how to add another contraption (a Flanger) to the patch, which you will use to process sound from the TestGen contraption.
How to set up the new patch
| First, disconnect the patch cords from your first patch: |
|---|
|


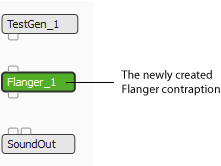
| Next, create a Flanger contraption: |
|---|
|
| Connect the Flanger to the other contraptions: |
|---|
|
Your completed patch should look something like this:
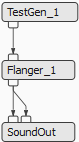
The sound output from TestGen is now being processed by the Flanger. Switch the TestGen to output Noise. You should be able to hear the effect of the Flanger filter repeatedly sweeping across the noise.
Exploring contraption parameters
| Open the Flanger's Property Editor: |
|---|
|

You'll notice that there are different kinds of controls on the Flanger's Property Editor. There are sliders (Rate, Feedback, Wet/dry mix) and a range slider (Range). You can use sliders to control a single parameter value. Range sliders function similarly to sliders, except you use them to control both the minimum and maximum of a range of values.
| To change the value of a slider: |
|---|
|

| To move the range slider: |
|---|
To move the minimum and maximum values independently:
|


Try experimenting with the sliders on the Flanger and see what new sounds you can make.
| Try the following: |
|---|
|
You can read more about the Flanger and its other parameters on its Help File page. Click on the ? button in the title area of the Flanger's Property Editor to open the page directly.
Note: clicking on the ? button on any contraption's Property Editor will take you to the Help File page for that contraption. This is a quick way to find out more about a contraption while you're working.
Exploring Further
In this tutorial you've learned how to create contraptions and connect them together to make patches that generate and process sound. You've also learned how to use contraption Property Editors to change properties that affect the sound of each contraption. Now you've learned the basics, you can explore further.
To see some patches other people have made with AudioMulch, check out the Example Files directory in AudioMulch. To open the directory, go to the File menu, select Open, and double-click on the Examples folder. Start with the Basic Examples files first, then progress later to the Applied Examples. You can read descriptions of these files in Guide to the Example Files.
To build further on the patches you've created in this tutorial, try substituting other contraptions from the effects category for the Flanger, or other contraptions from the SignalGenerators category for the TestGen.
Read on to the next page, Contraptions: What They are and What They Do, to learn about the different types of contraptions in AudioMulch.
You can find out more about the individual contraptions and what they do by clicking on the ? button on the contraption's Property Editor. This will open the Help File page for that contraption.
See Also
- Contraptions: What They are and What They Do
- Contraptions Guide
- Using Common Contraption Controls
- Guide to the Example Files
- Flanger
- TestGen
- SoundOut
| Previous Next |